Star D Tripod Leg Repair

This is the brand my father owned. Mine came from a thrift store. I was asked to illustrate the repair of the leg lock mechanism so here it is.

The leg in question did not lock. I gave instructions, but only tried the temporary cardboard fix. Here I take my own advice and use the lid of a Chinese food container to make a new washer for the mechanism. My bet is you can get something at a hardware store that will do the trick, but if you have this at home. the fix is cost and relatively frustration free.

First remove the locking ring – you don’t have to take the leg off to do it, just unscrew it until it slides off the bottom. If you do this with a mechanism that works you should see a plastic split ring inside. The white arrow shows the original position of the ring.Image

To make a new one, I used the lid of a plastic Chinese food container. I measured the ring and got 5.2 cm long X 1 cm wide. The initial fit was bad (see below, lower right inset) – the gap you see in the original ring needs to be there to allow the mechanism to tighten it around the leg. I trimmed it to 4.8 cm.

The plastic ring needs to go on first (see below, upper left inset). Then the metal ring went on and I tightened it so that the plastic went back into the bottom of the metal ring.

Trial and error taught me that I needed to be careful installing the new part since it doesn’t curve like the original. The first two tries resulted in the plastic getting caught between the two legs (see below, lower left). I held the plastic with my fingers but I imagine you could use tape to hold it in the right place.

Image

This fix worked perfectly – the ring locked the leg tight and withstood me leaning my weight on it. If I were doing this for myself I would make two, because if you need to take the ring off at any time, it might be easier to replace with a new one.

Star D Davidson Tripod fix

This was my tax refund gift to myself. I used most of my refund to pay bills. But I went shopping at the local thrift store and bought a couple of projects so I could say that I had gotten something for myself.

The tripod is a Davidson Star D – clunky, heavy, vintage  piece of heaven with adjustable legs, a panning/tilt head and height adjustment – all with flip locks. This one didn’t work in the store – how could I resist? Not to mention the reasonable $8.98 price tag. $4.99 at ebay, but I would have had to bid on it and pay shipping.

Five minutes after getting it home it was dismantled and two fat pieces of rubberband removed from the works. It still didn’t work because I forgot to re-set one of the flip locks. After the re-assembly was complete, it worked like a dream. A great alternative to my Japanese tripod which is portable, durable (metal) and light. Light means that Mr. Ham Hands (that would be me) knocks it over too easily.

The Davidson won’t fall in a storm. Needless to say, I am happy.

Expect an edit for more later about the actual process – there was one step – removing the legs – that was a little tricky. I will have pics too. Any questions, feel free to ask!

Quick Fixes

Coming soon (again) – these are fixes already done – I am behind on blogging things.

Lights go out when it’s cold, washing machine stopped on spin cycle – it was “sort of” the lid; 1999 toyota camry headlights went out one by one (fuses), broken tripod (loose parts), sparking microwave (condensation), coffemaker cleaning (oxygen bleach).

Fix it fails: build your own digital antenna.

Radio Shack 15 watt soldering iron – Review

Here’s the little bugger: RS 15 Watt. I bought it because at the end of a long journey I needed to solder a battery onto an mp3 motherboard. The start of the journey was me leaving my creative zen V plus 4GB mp3 player at the gym. I didn’t realize I had left if there, and my social skills being what they are, I couldn’t bring myself to ask. I assumed I had lost it elsewhere and after a thorough search in two states, I bought “new” ones on ebay. The first one had a broken LCD but I am intimately familiiar the the Zen so I could navigate with some difficulty. I bought others and they were sent to the wrong address.

I need my music.

By the time I found the Zen I’d lost (I got up my guts and asked), I had acquired a bunch of non-functional ones. Reviews and repairs upcoming – promise!

One had a firmware problem but wouldn’t shut off. I finally had to clip the battery leads – once I did that I was able to reload the firmware and the player worked fine. However, I had no way of reattaching the battery. I tried glue: yeah, no. I haven’t soldered anything since who knows when so I did research and went to Radio Shack. I have a good opinion of the chain – I’ve bought things there that literally lasted a lifetime – and they are the same company that makes Tandy leather supplies – yes, I did leathercraft.

I am annoyed. The soldering iron was what you’d expect for $9 – cheaply made but once I got used to its quirks, it did the job. But my review posted neither there nor here (they have a service that posts the review on your blog) I came over to tell you myself.

It’s not the best thing, but for $9 and learning how to repair mp3’s it’s just right. I expect it will break – the tip doesn’t screw all the way in to the pencil, and even tightening it with a rubber grip still left it loose.  It didn’t get hot enough to use with desoldering braid, but I must admit it was nice to work with a cool iron and not worry about frying the board.  Other reviewers found the stand useless but I am guessing they had better alternatives.

Eh – three and a half stars. The best thing is that it wasn’t expensive and it did an adequate job. I wouldn’t recommend it as for your toolbox, but it’s good for a quickie… 😛

I will be posting later about the zen repair as well as the dryer and car lock repair – all completed.

Unresponsive Touchpad Creative Zen Micro

I can’t take credit for this one. If you have an MP3 player and want to try repairing it, go here: Repair4player and follow their instructions to take it apart.

I bought this 6GB player on Ebay for $5.25 including shipping. The owner auctioned it off because she dropped it and the touchpad stopped working. She thought the battery was dead too, and the player wouldn’t turn off.

Gotta love the interrnet. I looked up the problem and the dissassembly instructions and within about an hour I had a working MP3 player. The Micro isn’t my favorite, though – mine’s the Zen V plus – awesome sound and crystal clear video, and the voice recorder works like my expensive ones.

What was wrong? The touchpad connector had come loose when she dropped it. I replugged it and charged it – listening to Great Big Sea right now.

I haven’t forgotten the coming soon. I will post them as soon as I am a little less fried.

Coming Soon 2

😛 More repairs and how to….

Sigh – I have to fix a clothes dryer first…but coming soon:

How not to take apart your Creative Zen V Plus, including as much as I can find and photograph on parts, etc.  Also some review and comparison stuff.

A new series on fountain pens – nibs, mostly.

Repairman Cosplay?

How to teach yourself to draw and paint – art, silly, not cars or stuff. Well, you could learn to draw cars, but…OK, now I am confusing myself. Anyway, stuff on how to teach yourself to draw, including my favorite websites and books for learning that kind of stuff.

The bumper and car locks are still on the menu, however I am going to a tire place to have the spare tire mounted.

Sony earbud cable repair

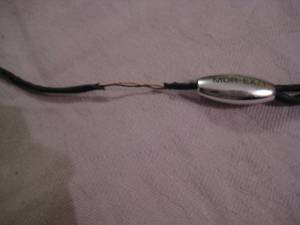
OK, so I’m a cheapskate. The earbuds are noise canceling and they work better than any other noise cancelling headphones I’ve gotten since. I bought others because since Sony came out with them, there came a host of imitators. Somehow the cable on mine got tied in a knot and that abraded the covering. I don’t know why, but it actually ripped in places, exposing the wires. Sadly, I put them away hoping to find materials to repair them.

Stripped Wires

Stripped Wires

Radio shack sells a heat shrink tubing that might have worked but for two things – it isn’t as flexible as the original tubing on the earbuds, and I didn’t want to experiment to find out if the wiring would stand up to being heated with a blow drier. Oh, and I don’t own a blow drier.

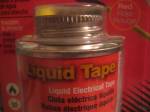
Advance video two years, and as I am going through the electrician’s haven of Home Depot, what should I find but liquid electrical tape. Worth a try…

Liquid Tape

Liquid Tape

I bought some of this stuff and tested it on string – quite flexible but goopy and hard to handle. I decided this wouldn’t be a bad obstacle – after all, my mp3 player is a Creative Zen, and I am not making a fashion statement  – i am listening to music.

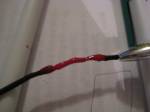
Repaired!

I applied the goop with my own brush – the one that came in the can was too big. I threw away the brush after using it – too much trouble to clean it. I had to use several layers since the liquid was so thin. What I ended up with was ugly but worked well.

I tried the headphones before the liquid was fully dry and they didn’t work – but once the fluid was dry they were fine. Now I have ugly wonderful earbuds, and no one will be able to claim they’re not mine…

A side note – they did have black liquid tape, but in order to get it you had to take a ticket and engage the assistance of a store employee. A controlled substance? My social skills are notoriously bad, so I took the red instead.

1999 Toyota Camry Air Conditioner Recharge

This one is easy and I spent more than I needed, but better safe than sorry.

The air conditioner worked a little before my mom totaled it, but after it worked not at all that I could tell. I am not a fan of CFCs so I rarely used it and thus didn’t care.

Then came Florida. On my first trip from Massachusetts to Florida it was late spring and the heat was bad but not unbearable. I also stopped in Atlanta for a couple of days, and made the trip that far mostly overnight. My first week in Florida the air conditioner for the house was broken and the temperature stayed in the 90s. I got very sick.

So, on my second trip, I planned to have the AC done. But there were all kinds of noises to take care of and when I took it to a mechanic he told me to sell it. ??? I took the car to my mechanic, and on my mom’s advice had the timing belt changed (expensive, but that is too much for me to tackle at this point) and new tires put on. I saved one of the better tires to use as a spare. But between the tires and the timing belt, I had no money left to do the recharge – they generally charge anywhere from $80 and up in MA. So I did a little research and found that there are instructions all over the internet for how to do this.

The only sticky part was not knowing if it didn’t work because there was a huge hole or some other malfunction. I tested the air conditioner and it could have been my imagination, but I thought the air coming out was slightly cooler. The other key was testing it in the rain – I let my windshield fog up, and turned the air on along with the defroster – it worked like crap, but it worked.

I bought an extra cold air conditioning refill kit (can of freon,  hose and pressure gauge) and some refill with dye, along with a UV flashlight. My plan was to use the kit and if the air conditioner didn’t work I would use the dye to find and repair the leak.

I followed the instructions on the can.

I found the low pressure side port – it’s the one closest to the firewall – and took the blue cap off – I put it in my pocket since I am inclined to lose such things.
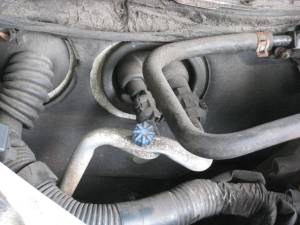
the low pressure side port

the low pressure side port

Warning! I would not, I reapeat not do this repair if Icouldn’t tell which was the low pressure side port – unless I wanted to ruin my car and maybe die. I might be crazy, but I’m not stupid.

I started the car, put the air conditioner on high, and attached the refill. It was one with a leak stopper that said to put some freon in, see if the compressor came on and if it didn’t, take the car to a mechanic.

I attached the hose and followed the filling instructions which said to shake and rotate the can at the same time (I alternated shaking and rotating). At first the pressure went up, then it went to zero. I was sure this meant a hole, so I stopped and let it run a little. Then I realized I had not opened the valve on the can completely, so I opened it again – this time all the way. To my delight, the pressure started rising steadily.

I wore goggles and gloves, and kept my head out from under the hood – it was at least 90 degrees and I don’t fancy explosions. When the pressure was close to the recommended level for the ambient temperature, I shut off the valve. Then I got into the car and enjoyed the air conditioning for about 15 minutes (some sites say let it go for 20 minutes, but I was planning on driving later that day).
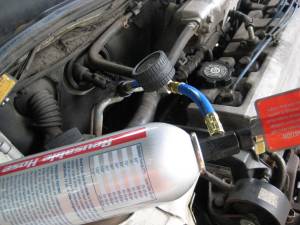
Filling the Air Conditioner

Filling the Air Conditioner

The guy at the parts store had recommended two cans based on his looking up the capacity of my model, but this refill only used one can – and that one wasn’t completely used up. I have the can stored in a cool place in my house because I didn’t fill it to the recommended pressure – I am waiting for a cool day to do that.

How does it work – it’s cold. It’s mercifully cold, and now I can drive when the heat is bad, but more importantly, I can dry the air in the car when it’s humid. Heat I can stand. Humidity is hell.

My suggestion as always is don’t try this at home – I am willing to take chances with my car and my life. You, however, are not crazy and therefore should think about it.

Coming Soon

I have been fixing things, just not taking pics or writing about every single thing.

Coming soon: fixing my $50 noise canceling headphones (done), charging my toyota camry air-conditioner (later this week or early next) and other minor repairs. I may try to repair the bumper on the camry and change the locks. I also need to swap out some forum software, market a writing group and other less hands on things.

I plan on building my own slingshot but that’s going to take some research.

April Update

I just drove from Boston to Atlanta – nothing to fix but the headlight worked great – no water inside. I haven’t changed the other side because that would involve taking the fender off and I don’t want to. I am contemplating installing new door locks but I want to see if I can get them on ebay first, otherwise I’ll just be switching the passenger side with the driver side, or fiddling with the pins. Keys work in the passenger side but after a short time they stop working in the driver side.

The pochade box project has been on hold of sorts. I have pics for what I worked on but I was too tired from packing to move so there’s no text yet.

Haven’t fixed anything of note yet. the surgeon who fixed my back did a great job and now i am testing my life without narcotics. I think I am a better man for it.